The Disc Brake Conversion
Posted: Thu Sep 13, 2012 10:02 pm
As promised, here is an explanation of how I have fitted disc brakes to 'Alice' my stage 1.
Please note that I am aware that this topic has been raised before (and I'm sure the debates will continue), but these are my findings on this much talked about subject.
PLEASE NOTE THAT THESE VIEWS ARE MY OWN, BASED ON WHAT I HAVE MANAGED TO FIND OUT.
I'll start at the begining.
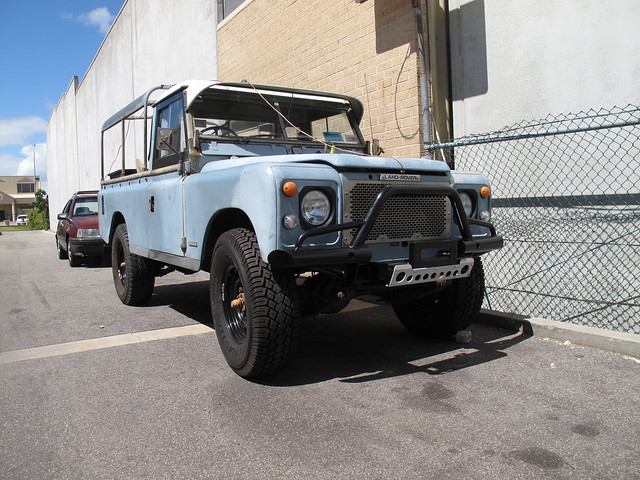
After aquiring my Stage 1, I decided that I needed a plan of action to decide what modifications/improvements I was wanting to make to the vehicle, as this is going to replace my current Discovery 2 as my everyday transport.
On the list are things such as seats from Exmor Trim, Interior trim kit from La Salle, gearbox upgrade, engine upgrade, sound proofing etc etc and to see if I could fit disc brakes.
I know that this list will have the rivit counters turning in their graves, but 'Alice' needs to be comfortable and safe to drive on today's conjested roads. The thought of hitting the brakes hard with my family on board and towing my caravan, and not knowing which way the vehicle is going to vear first, didn't bear contemplating. Now I can already hear the shouts of 'a properly maintained drum brake setup is as good as disc brakes', but I also own a series 3 Leightweight (same brake setup) and the brakes are well maintained, properly adjusted etc etc, and under sudden heavy breaking, the vehicle dives in either direction until all the brake shoes start to work properly!!
The first thing that I quickly established is that NONE of the later axle (Coil sprung axles) components, with the exception of the CV joint, will fit the series/stage 1 axle.
The only way you could do this is to cut of the flange at the end of the series axle and weld on a new flange taken from a newer donor axle. A right nightmare of making sure that everything is aligned spot on.
The other option is to take a coil sprung axle, gring off the suspension mountings, and replace them with the leaf spring fixings. Again a nightmare of a job to ensure the alignment is spot on, plus you will now have the wheels sticking out from the body work, and will probably need a 'Q' plate and also be subjected to the SVA test! If you decide on this option, go and buy a Defender to save you the time and hastle.
For those who are not in the UK, if you change too many of the major components, engine, gearbox, axles, chassis etc, the vehicle will need a 'one off' type approval or SVA test. You also loose the registration mark, to be replaced with one that starts with a 'Q' denoting it as a 'kit' or modified car. I believe that the Australians and New Zealanders have a much stricter system in force.
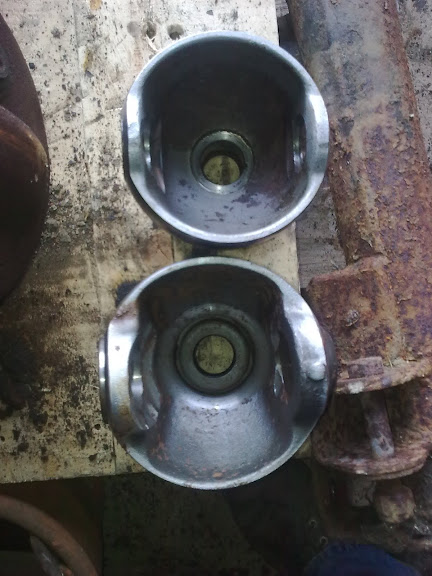
The above picture shows the difference between a coil sprung axle (top) and leaf sprung axle (bottom) swivel balls. The first thing you should notice is the difference in the thickness of the metal, particuarly around the bush and bearing seats, the other is not so clear in the picture is the physical size. The leaf sprung item is has a much bigger diameter. In fact when you look at the size of the leaf sprung swivel compared to the coil sprung item, you can see how much more stronger the leaf sprung setup is. This was later confirmed with a conversation with Tim Cooper. (Tim Cooper, a legend amonst the leaf spring fans in the states, designed and developed a number of conversions for the series vehicles quite some time ago, including a disc brake conversion.)
It has also become apparent that the Stage 1 front axle setup, is one of the strongest setup's that Landrover has ever used!!!
Back to Alice :- both swivel balls needed to be replaced, a quick shop around revealed how much they cost!!!!
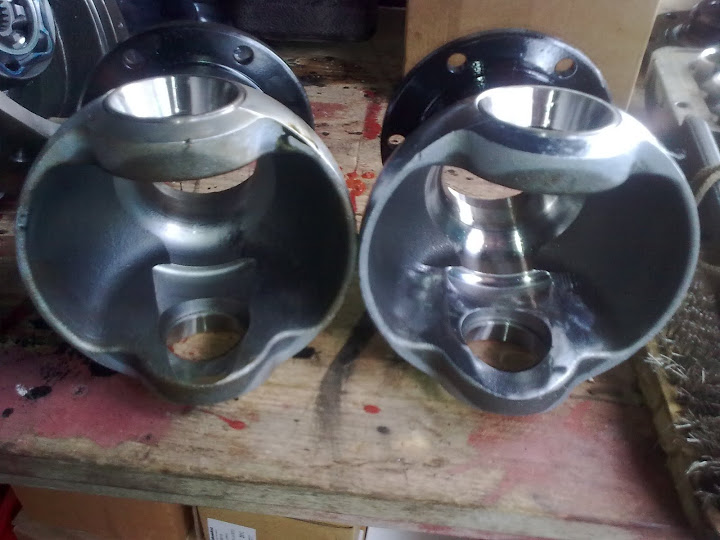
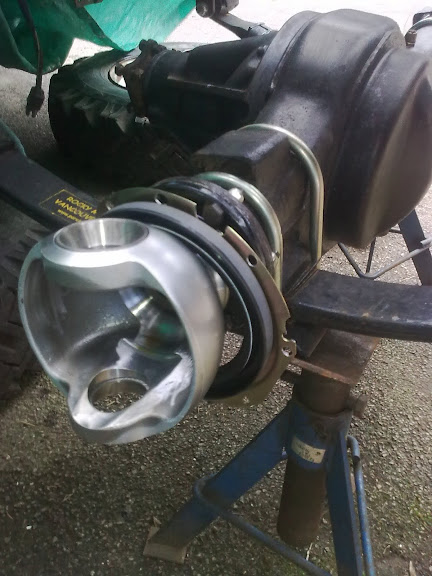
THE STANDARD SERIES 3 SWIVEL BALL WILL FIT THE STAGE 1 FRONT AXLE. Alls that is required is to remove an edge after machining to clear the CV joint. As you can see from the picture below.
This was achieved buy using a hand held grinding tool. eg dremel or an air powered tool. I estimate that aprox 1mm of material needs to be removed to give sufficent clearance for the CV joint.
The other mod I wanted to make was to replace the top swivel bush with a taper roller bearing. Having experienced the violent steering wheel shudder that you get if this bush has even the tinyest bit of play, and given that the braking forces would now be higher and impose more load on the top bush, I felt that this go someway to help reduce this effect. The outer bearing race is the same diameter as the ralco bush, so that just pushes into place. Next I had to modify the top swivel pin to fit into the inner race of the bearing.
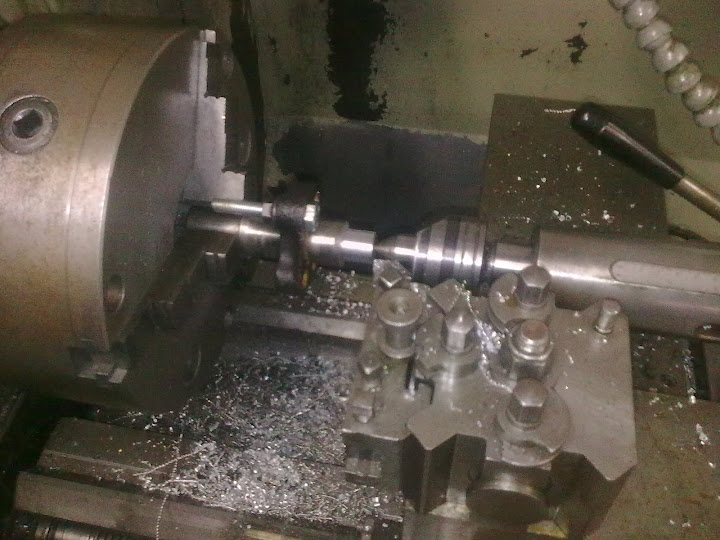
Easy enough to do if you have access to the right equipment. Or take the pin to a company who can turn the pin down for you.

The pin needs to be turned down to a diameter of 19mm. The height of the larger diameter needs to be 22mm. Above is the before and after. Sorry about the poor quality of photo.
Set the swivel up as per normal using shimms to get the correct preload set. One thing that I noticed, was that the swivel had a nice smooth feel to it's movement, so I'm hoping that it may have also improved the 'feel' of the steering.
Back to the disc brake kit. I bought a full vehicle kit from Roam Off Road, basied in California. The guy's in the states have been extreamly helpful, and full of advice. Now this kit is not cheap, but as 'Alice' is going to be with us for sometime, I felt that the investment was worth it.
The kit consists of new swivel housings, which have been cast with lugs on to accept the brake caliper, new hubs to which solid or vented discs can be bolted to and all the nuts and bolts that will be required to fit the kit. I have to say that I was very impressed with the quality of the castings (which are all crack checked before machining) and the hubs, which even have new wheel nuts!!!
Above, new swivel ball fitted ready to fit the swivel housing.
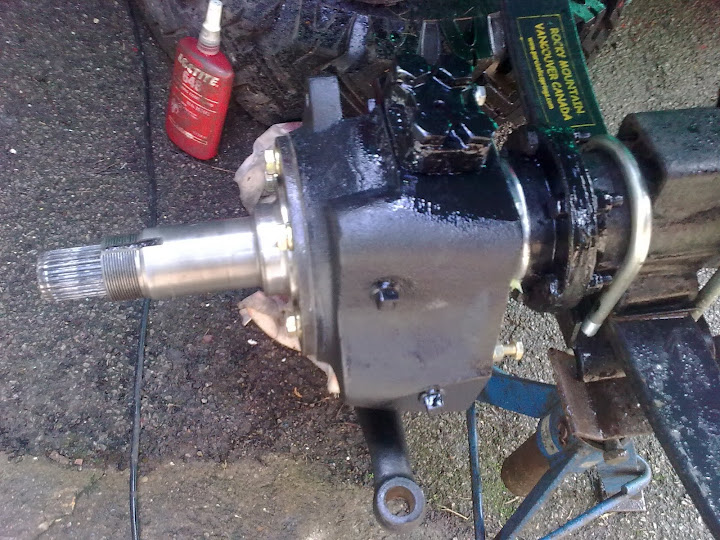
Swivel housing all bolted up.
Next myth to bust. CV joint AEU2622 WILL fit. This is an early Defender CV joint and is one of the strongest joints that was made, according to my research. There are some issues with this CV joint. As mentioned elsewhere on this forum, this joint (AEU2622) is slighly shorter than the genuine Stage 1 CV, so the driving cap will need approx 2mm machining of the end to allow the circlip to fit.
Again sorry for the poor quality of this image.
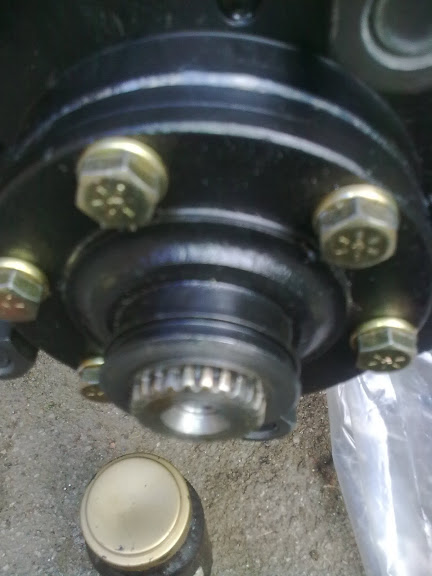
The other issue is that it is a slighly larger diameter, so won't fit through the swivel housing. I just inserted the halfshaft before I fitted the swivel housing. I may at a later date open up the apature in the housing.
All built up, hub fitted, just need to fit the driving cap and caliper.
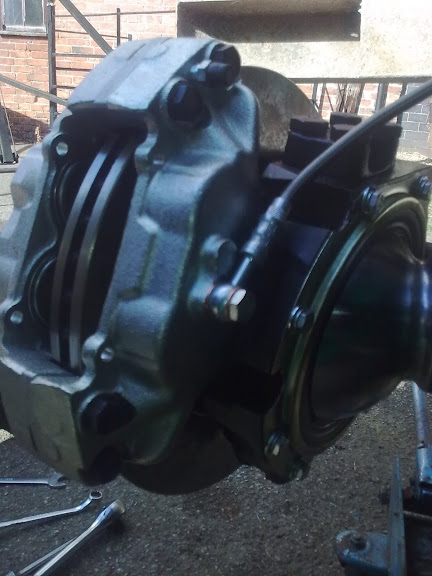
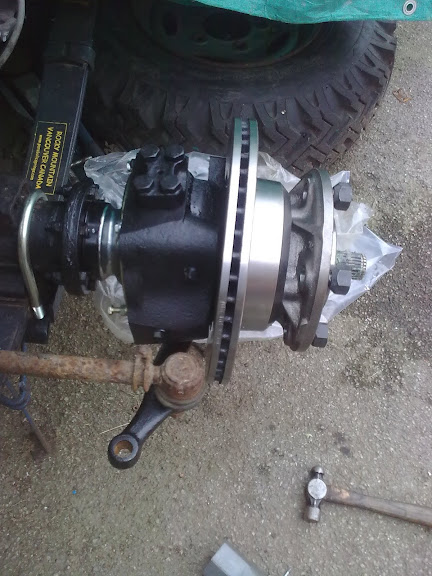
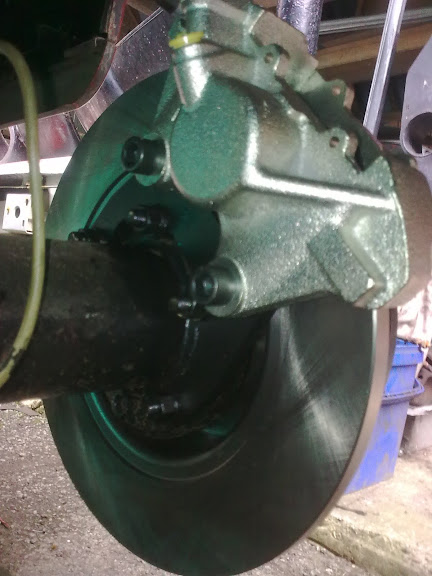
Everything fitted. Note I had to shim out the caliper to get it to sit centrally over the disc. Also note the high quality brake hose supplied with the kit.
The rear discs are simply a case of unbolting all the unwanted drum related parts, fitting the supplied bracket, and bolt on the caliper.

The calipers and discs are Defender parts, so replacement parts eg brake pads are easy to source. What I am also changing is the brake servo and master cylinder. The Stage 1 setup gives a 50:50 split between front and rear. The increased braking effort at the front coming from having four wheel cylinders as opposed to two on the rear. By using the defender master cylinder, the brake bias is approx 70:30 front rear.
The series brake servo is a 6 inch dia servo, the Defender had an 8 and 10 inch dia servo fitted giving greater vacuum assistance. I believe that there may be some clearance issues if you were to use the 10 inch servo. Unfortunately, the attachment of the sevo to pedal is different on the Defender, so I have sourced a new brake pedal. I have heard that some have bodged it to get it to fit. When it comes to brakes and steering you want it right, so I think that the only way is to replace the pedal. Will also have to change the clutch pedal as well because they are a different style.
The Defender master cylinder is also a 3 line system, so you can remove the shuttle valve at the base of the bulkhead. (From what I have heard, this valve makes bleeding the system a nightmare.)
So there you go. How to fit disc brakes to your Stage 1 or series Landrover. I don't think that I have forgotten anything, if I have I'll add it later.
Spen.
Please note that I am aware that this topic has been raised before (and I'm sure the debates will continue), but these are my findings on this much talked about subject.
PLEASE NOTE THAT THESE VIEWS ARE MY OWN, BASED ON WHAT I HAVE MANAGED TO FIND OUT.
I'll start at the begining.
After aquiring my Stage 1, I decided that I needed a plan of action to decide what modifications/improvements I was wanting to make to the vehicle, as this is going to replace my current Discovery 2 as my everyday transport.
On the list are things such as seats from Exmor Trim, Interior trim kit from La Salle, gearbox upgrade, engine upgrade, sound proofing etc etc and to see if I could fit disc brakes.
I know that this list will have the rivit counters turning in their graves, but 'Alice' needs to be comfortable and safe to drive on today's conjested roads. The thought of hitting the brakes hard with my family on board and towing my caravan, and not knowing which way the vehicle is going to vear first, didn't bear contemplating. Now I can already hear the shouts of 'a properly maintained drum brake setup is as good as disc brakes', but I also own a series 3 Leightweight (same brake setup) and the brakes are well maintained, properly adjusted etc etc, and under sudden heavy breaking, the vehicle dives in either direction until all the brake shoes start to work properly!!
The first thing that I quickly established is that NONE of the later axle (Coil sprung axles) components, with the exception of the CV joint, will fit the series/stage 1 axle.
The only way you could do this is to cut of the flange at the end of the series axle and weld on a new flange taken from a newer donor axle. A right nightmare of making sure that everything is aligned spot on.
The other option is to take a coil sprung axle, gring off the suspension mountings, and replace them with the leaf spring fixings. Again a nightmare of a job to ensure the alignment is spot on, plus you will now have the wheels sticking out from the body work, and will probably need a 'Q' plate and also be subjected to the SVA test! If you decide on this option, go and buy a Defender to save you the time and hastle.
For those who are not in the UK, if you change too many of the major components, engine, gearbox, axles, chassis etc, the vehicle will need a 'one off' type approval or SVA test. You also loose the registration mark, to be replaced with one that starts with a 'Q' denoting it as a 'kit' or modified car. I believe that the Australians and New Zealanders have a much stricter system in force.
The above picture shows the difference between a coil sprung axle (top) and leaf sprung axle (bottom) swivel balls. The first thing you should notice is the difference in the thickness of the metal, particuarly around the bush and bearing seats, the other is not so clear in the picture is the physical size. The leaf sprung item is has a much bigger diameter. In fact when you look at the size of the leaf sprung swivel compared to the coil sprung item, you can see how much more stronger the leaf sprung setup is. This was later confirmed with a conversation with Tim Cooper. (Tim Cooper, a legend amonst the leaf spring fans in the states, designed and developed a number of conversions for the series vehicles quite some time ago, including a disc brake conversion.)
It has also become apparent that the Stage 1 front axle setup, is one of the strongest setup's that Landrover has ever used!!!
Back to Alice :- both swivel balls needed to be replaced, a quick shop around revealed how much they cost!!!!
THE STANDARD SERIES 3 SWIVEL BALL WILL FIT THE STAGE 1 FRONT AXLE. Alls that is required is to remove an edge after machining to clear the CV joint. As you can see from the picture below.
This was achieved buy using a hand held grinding tool. eg dremel or an air powered tool. I estimate that aprox 1mm of material needs to be removed to give sufficent clearance for the CV joint.
The other mod I wanted to make was to replace the top swivel bush with a taper roller bearing. Having experienced the violent steering wheel shudder that you get if this bush has even the tinyest bit of play, and given that the braking forces would now be higher and impose more load on the top bush, I felt that this go someway to help reduce this effect. The outer bearing race is the same diameter as the ralco bush, so that just pushes into place. Next I had to modify the top swivel pin to fit into the inner race of the bearing.
Easy enough to do if you have access to the right equipment. Or take the pin to a company who can turn the pin down for you.
The pin needs to be turned down to a diameter of 19mm. The height of the larger diameter needs to be 22mm. Above is the before and after. Sorry about the poor quality of photo.
Set the swivel up as per normal using shimms to get the correct preload set. One thing that I noticed, was that the swivel had a nice smooth feel to it's movement, so I'm hoping that it may have also improved the 'feel' of the steering.
Back to the disc brake kit. I bought a full vehicle kit from Roam Off Road, basied in California. The guy's in the states have been extreamly helpful, and full of advice. Now this kit is not cheap, but as 'Alice' is going to be with us for sometime, I felt that the investment was worth it.
The kit consists of new swivel housings, which have been cast with lugs on to accept the brake caliper, new hubs to which solid or vented discs can be bolted to and all the nuts and bolts that will be required to fit the kit. I have to say that I was very impressed with the quality of the castings (which are all crack checked before machining) and the hubs, which even have new wheel nuts!!!
Above, new swivel ball fitted ready to fit the swivel housing.
Swivel housing all bolted up.
Next myth to bust. CV joint AEU2622 WILL fit. This is an early Defender CV joint and is one of the strongest joints that was made, according to my research. There are some issues with this CV joint. As mentioned elsewhere on this forum, this joint (AEU2622) is slighly shorter than the genuine Stage 1 CV, so the driving cap will need approx 2mm machining of the end to allow the circlip to fit.
Again sorry for the poor quality of this image.
The other issue is that it is a slighly larger diameter, so won't fit through the swivel housing. I just inserted the halfshaft before I fitted the swivel housing. I may at a later date open up the apature in the housing.
All built up, hub fitted, just need to fit the driving cap and caliper.
Everything fitted. Note I had to shim out the caliper to get it to sit centrally over the disc. Also note the high quality brake hose supplied with the kit.
The rear discs are simply a case of unbolting all the unwanted drum related parts, fitting the supplied bracket, and bolt on the caliper.
The calipers and discs are Defender parts, so replacement parts eg brake pads are easy to source. What I am also changing is the brake servo and master cylinder. The Stage 1 setup gives a 50:50 split between front and rear. The increased braking effort at the front coming from having four wheel cylinders as opposed to two on the rear. By using the defender master cylinder, the brake bias is approx 70:30 front rear.
The series brake servo is a 6 inch dia servo, the Defender had an 8 and 10 inch dia servo fitted giving greater vacuum assistance. I believe that there may be some clearance issues if you were to use the 10 inch servo. Unfortunately, the attachment of the sevo to pedal is different on the Defender, so I have sourced a new brake pedal. I have heard that some have bodged it to get it to fit. When it comes to brakes and steering you want it right, so I think that the only way is to replace the pedal. Will also have to change the clutch pedal as well because they are a different style.
The Defender master cylinder is also a 3 line system, so you can remove the shuttle valve at the base of the bulkhead. (From what I have heard, this valve makes bleeding the system a nightmare.)
So there you go. How to fit disc brakes to your Stage 1 or series Landrover. I don't think that I have forgotten anything, if I have I'll add it later.
Spen.