The Disc Brake Conversion

Technical questions and answers
Alicerover
Posts: 172
Joined: Wed Nov 16, 2011 10:34 pm
Location: Leicestershire

The Disc Brake Conversion

Post by Alicerover »

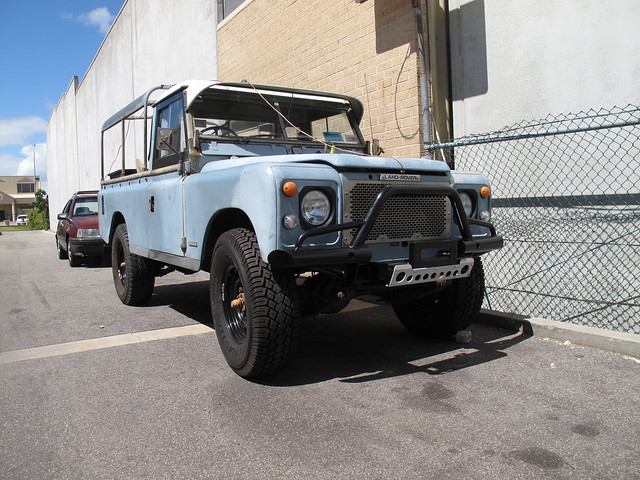
As promised, here is an explanation of how I have fitted disc brakes to 'Alice' my stage 1.
Please note that I am aware that this topic has been raised before (and I'm sure the debates will continue), but these are my findings on this much talked about subject.

PLEASE NOTE THAT THESE VIEWS ARE MY OWN, BASED ON WHAT I HAVE MANAGED TO FIND OUT.

I'll start at the begining.
After aquiring my Stage 1, I decided that I needed a plan of action to decide what modifications/improvements I was wanting to make to the vehicle, as this is going to replace my current Discovery 2 as my everyday transport.
On the list are things such as seats from Exmor Trim, Interior trim kit from La Salle, gearbox upgrade, engine upgrade, sound proofing etc etc and to see if I could fit disc brakes.
I know that this list will have the rivit counters turning in their graves, but 'Alice' needs to be comfortable and safe to drive on today's conjested roads. The thought of hitting the brakes hard with my family on board and towing my caravan, and not knowing which way the vehicle is going to vear first, didn't bear contemplating. Now I can already hear the shouts of 'a properly maintained drum brake setup is as good as disc brakes', but I also own a series 3 Leightweight (same brake setup) and the brakes are well maintained, properly adjusted etc etc, and under sudden heavy breaking, the vehicle dives in either direction until all the brake shoes start to work properly!!

The first thing that I quickly established is that NONE of the later axle (Coil sprung axles) components, with the exception of the CV joint, will fit the series/stage 1 axle.
The only way you could do this is to cut of the flange at the end of the series axle and weld on a new flange taken from a newer donor axle. A right nightmare of making sure that everything is aligned spot on.
The other option is to take a coil sprung axle, gring off the suspension mountings, and replace them with the leaf spring fixings. Again a nightmare of a job to ensure the alignment is spot on, plus you will now have the wheels sticking out from the body work, and will probably need a 'Q' plate and also be subjected to the SVA test! If you decide on this option, go and buy a Defender to save you the time and hastle.
For those who are not in the UK, if you change too many of the major components, engine, gearbox, axles, chassis etc, the vehicle will need a 'one off' type approval or SVA test. You also loose the registration mark, to be replaced with one that starts with a 'Q' denoting it as a 'kit' or modified car. I believe that the Australians and New Zealanders have a much stricter system in force.
Image
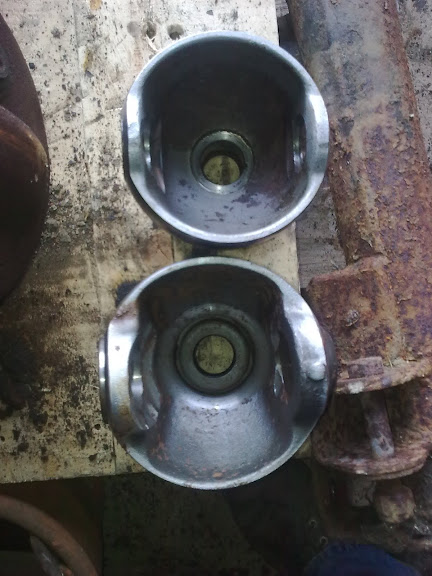
The above picture shows the difference between a coil sprung axle (top) and leaf sprung axle (bottom) swivel balls. The first thing you should notice is the difference in the thickness of the metal, particuarly around the bush and bearing seats, the other is not so clear in the picture is the physical size. The leaf sprung item is has a much bigger diameter. In fact when you look at the size of the leaf sprung swivel compared to the coil sprung item, you can see how much more stronger the leaf sprung setup is. This was later confirmed with a conversation with Tim Cooper. (Tim Cooper, a legend amonst the leaf spring fans in the states, designed and developed a number of conversions for the series vehicles quite some time ago, including a disc brake conversion.)
It has also become apparent that the Stage 1 front axle setup, is one of the strongest setup's that Landrover has ever used!!!

Back to Alice :- both swivel balls needed to be replaced, a quick shop around revealed how much they cost!!!!
THE STANDARD SERIES 3 SWIVEL BALL WILL FIT THE STAGE 1 FRONT AXLE. Alls that is required is to remove an edge after machining to clear the CV joint. As you can see from the picture below.

Image

This was achieved buy using a hand held grinding tool. eg dremel or an air powered tool. I estimate that aprox 1mm of material needs to be removed to give sufficent clearance for the CV joint.
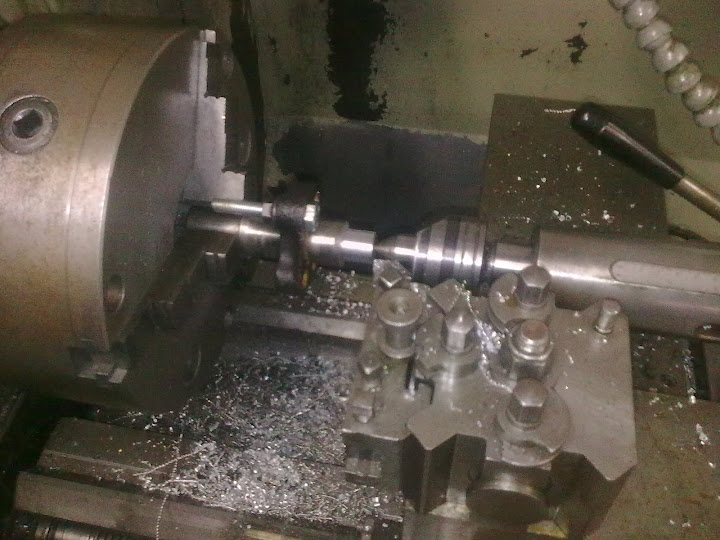
The other mod I wanted to make was to replace the top swivel bush with a taper roller bearing. Having experienced the violent steering wheel shudder that you get if this bush has even the tinyest bit of play, and given that the braking forces would now be higher and impose more load on the top bush, I felt that this go someway to help reduce this effect. The outer bearing race is the same diameter as the ralco bush, so that just pushes into place. Next I had to modify the top swivel pin to fit into the inner race of the bearing.
Image

Easy enough to do if you have access to the right equipment. Or take the pin to a company who can turn the pin down for you.

Image

The pin needs to be turned down to a diameter of 19mm. The height of the larger diameter needs to be 22mm. Above is the before and after. Sorry about the poor quality of photo.
Set the swivel up as per normal using shimms to get the correct preload set. One thing that I noticed, was that the swivel had a nice smooth feel to it's movement, so I'm hoping that it may have also improved the 'feel' of the steering.

Back to the disc brake kit. I bought a full vehicle kit from Roam Off Road, basied in California. The guy's in the states have been extreamly helpful, and full of advice. Now this kit is not cheap, but as 'Alice' is going to be with us for sometime, I felt that the investment was worth it.
The kit consists of new swivel housings, which have been cast with lugs on to accept the brake caliper, new hubs to which solid or vented discs can be bolted to and all the nuts and bolts that will be required to fit the kit. I have to say that I was very impressed with the quality of the castings (which are all crack checked before machining) and the hubs, which even have new wheel nuts!!!
Image

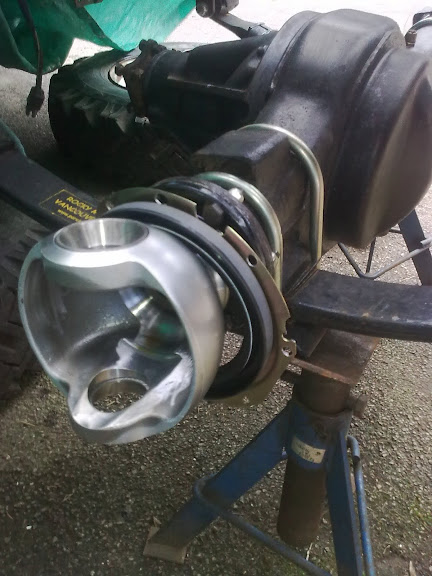
Above, new swivel ball fitted ready to fit the swivel housing.
Image

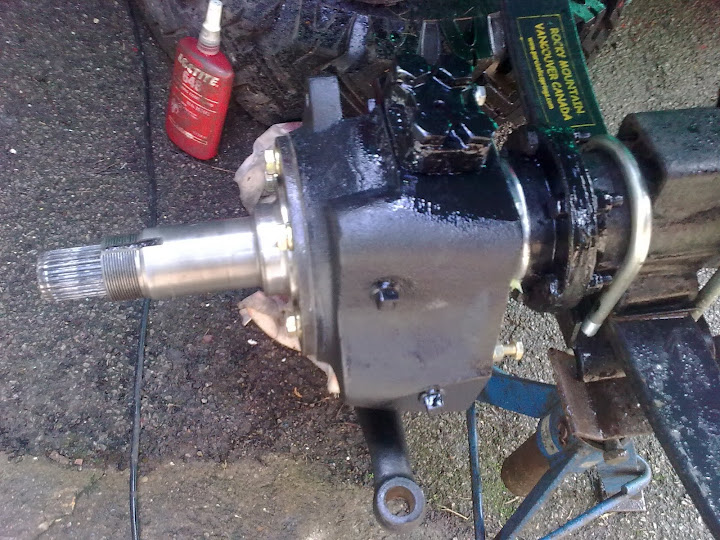
Swivel housing all bolted up.

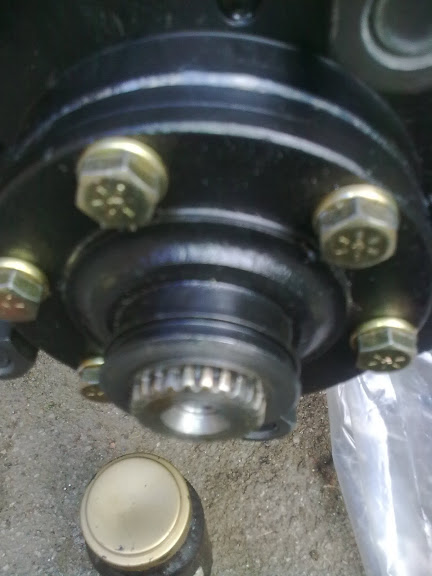
Next myth to bust. CV joint AEU2622 WILL fit. This is an early Defender CV joint and is one of the strongest joints that was made, according to my research. There are some issues with this CV joint. As mentioned elsewhere on this forum, this joint (AEU2622) is slighly shorter than the genuine Stage 1 CV, so the driving cap will need approx 2mm machining of the end to allow the circlip to fit.
Image

Again sorry for the poor quality of this image.
The other issue is that it is a slighly larger diameter, so won't fit through the swivel housing. I just inserted the halfshaft before I fitted the swivel housing. I may at a later date open up the apature in the housing.
Image

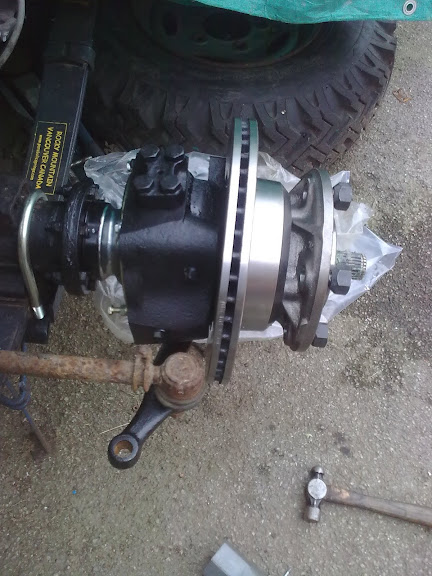
All built up, hub fitted, just need to fit the driving cap and caliper.

Image

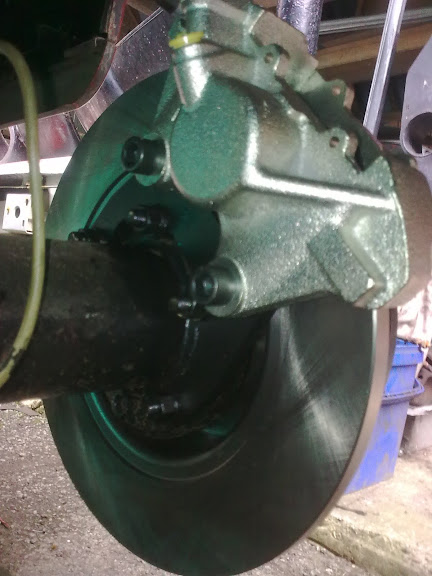
Everything fitted. Note I had to shim out the caliper to get it to sit centrally over the disc. Also note the high quality brake hose supplied with the kit.
Image

The rear discs are simply a case of unbolting all the unwanted drum related parts, fitting the supplied bracket, and bolt on the caliper.

Image

The calipers and discs are Defender parts, so replacement parts eg brake pads are easy to source. What I am also changing is the brake servo and master cylinder. The Stage 1 setup gives a 50:50 split between front and rear. The increased braking effort at the front coming from having four wheel cylinders as opposed to two on the rear. By using the defender master cylinder, the brake bias is approx 70:30 front rear.
The series brake servo is a 6 inch dia servo, the Defender had an 8 and 10 inch dia servo fitted giving greater vacuum assistance. I believe that there may be some clearance issues if you were to use the 10 inch servo. Unfortunately, the attachment of the sevo to pedal is different on the Defender, so I have sourced a new brake pedal. I have heard that some have bodged it to get it to fit. When it comes to brakes and steering you want it right, so I think that the only way is to replace the pedal. Will also have to change the clutch pedal as well because they are a different style.
The Defender master cylinder is also a 3 line system, so you can remove the shuttle valve at the base of the bulkhead. (From what I have heard, this valve makes bleeding the system a nightmare.)

So there you go. How to fit disc brakes to your Stage 1 or series Landrover. I don't think that I have forgotten anything, if I have I'll add it later.
Spen.
disco2hse
Posts: 1638
Joined: Sun Apr 27, 2008 3:51 am
Location: Auckland NZ

Re: The Disc Brake Conversion

Post by disco2hse »

Excellent. Thanks.
Alan

1983 ex-army FFR 109 Stage 1
2005 Disco 2 HSE TD5
Alicerover
Posts: 172
Joined: Wed Nov 16, 2011 10:34 pm
Location: Leicestershire

Re: The Disc Brake Conversion

Post by Alicerover »

Something else to add.
The cost of replacing the swivel balls and the CV joints with the genuine items would have cost me very close to £2000, as each swivel ball is around £450 and the CV joints are about £350 ish (I know that they may be sourced from some specalist reconditioners for a little less, but I would be questioning the quality).
The brake disc kit has cost me about the same to buy, along with all the other necessary parts, wheel bearings, swivel bearings, seals, calipers, disc's, pads, pin kit, swivel balls, AEU2622 CV joints, etc etc.
So it hasn't realy cost me any more to do, so with a bit of luck those suppliers with the genuine parts will now reduce their prices to a more realistic value
Spen
User avatar
wpalmo
Posts: 53
Joined: Mon May 21, 2012 9:28 am
Location: western australia

Re: The Disc Brake Conversion

Post by wpalmo »

Thanks Spen. I am sure that this thread will be a "must read first" for anyone with an idea of disk brake conversion for their Stagey. You have outlined and explained the topic very well. Looking forward to hearing how it drives with 4 wheel disk brakes.

Regards Warrick.
1981 Stage One V8 Truck Cab
2001 HSE 4.6 Range Rover
User avatar
wpalmo
Posts: 53
Joined: Mon May 21, 2012 9:28 am
Location: western australia

Re: The Disc Brake Conversion

Post by wpalmo »

Hi Spen,

Just wondering if you have had the chance to test drive the Stagey with the disk brakes fitted?

Also thought it would be good to post something on the forum to generate some life as it has been very quite the last 2 weeks. Hasn't anyone done anything to their Stage One, been anywhere or got a question on how to do something on their Stagey for the forum? Makes for some good reading when their is someone doing something.

Regards Warrick.
1981 Stage One V8 Truck Cab
2001 HSE 4.6 Range Rover
Alicerover
Posts: 172
Joined: Wed Nov 16, 2011 10:34 pm
Location: Leicestershire

Re: The Disc Brake Conversion

Post by Alicerover »

It has been a bit 'quiet' on here!!
I'm affraid that it will be a little while until Alice is back on the road to find out how the brakes perform. The list of jobs to do just seems to get longer and longer and my wallet thinner and thinner!!!!!
I'm currently trying to sell my Disco 2 to raise funds for the 'next phase' of project Alice. The next thing I need to get sorted is the gearbox, which needs reconditioning and I'm also looking at fitting the chain driven transfere box to give me the viscous centre diff, which should stop all the power dissapearing to one axle and it should also run quieter as well.
I also need to sort out the door tops and the window channels before the weather gets too bad. Then it will be a case of trying to remember where all the bits came from :lol:
harry potter
Posts: 262
Joined: Thu Mar 15, 2007 10:53 pm
Location: Leamington Spa

Re: The Disc Brake Conversion

Post by harry potter »

Well written Spen,
thats a great description on how to do the conversion.
you look like you have a all the gear in your work shop. Now you know what your doing, parts needed and what to machine up, would you look at sell the conversion in a kit form - ie source all the bits, machine up and sell?

l do not have the skill nor tools to do the conversion first hand (ie machining), but if l could buy a complete kit l would certainly consider fitting.

if you want to see how well the conversion works and if its going to be ages till your trucks back on the road, you could fire it all on mine :D :D
good luck with the rest of the build.
Regards, Harry
FenTiger
Posts: 24
Joined: Sun Jan 22, 2012 9:25 pm

Re: The Disc Brake Conversion

Post by FenTiger »

Have just finsihed fitting the Zeus front disc brake kit to my Stage one and the difference is amazing. Brakes that pull up straight everytime and with great pedal feel too.. The only downside is that you have to fit Wolf rims to clear them. Will get some piccies up when I get a chance.
User avatar
wpalmo
Posts: 53
Joined: Mon May 21, 2012 9:28 am
Location: western australia

Re: The Disc Brake Conversion

Post by wpalmo »

Fitting Wolf rims is not a downside in my opinion. Those rims are seriously tough rims and allow a much better choice of tyres. I run Wolf rims and wouldn't go back to original spec rims. My Wolfs are fitted with Kumho Venture 285/75/16's and these tyres are so much more comfortable to drive than the original spec tubed rims and cross-ply tyres. The other benefit of these tyres is the amount of grip they offer when you run them around 15psi on soft sand, which I do a lot. They offer awesome traction and easily outperform original kit.

Just my thoughts though and I am not really fussed about rivet counting, more about getting the best out of my Stage One.

Regards Warrick.

Wolf Rims fitted with 285/75/16's
Image
IMG_0466 by wpalmo, on Flickr
1981 Stage One V8 Truck Cab
2001 HSE 4.6 Range Rover
FenTiger
Posts: 24
Joined: Sun Jan 22, 2012 9:25 pm

Re: The Disc Brake Conversion

Post by FenTiger »

Oh, I am very happy with the Wolf's and have run them for quite some time on other leafers. Just fitted a set of 235 85 16 Coopers AT's that I had knocking around and it drives much nicer now.
noexitroad
Posts: 73
Joined: Sat Dec 04, 2010 8:51 am
Location: thames, new zealand

Re: The Disc Brake Conversion

Post by noexitroad »

Is that small piece of concrete your handbrake??? :lol: :lol: :lol:
User avatar
wpalmo
Posts: 53
Joined: Mon May 21, 2012 9:28 am
Location: western australia

Re: The Disc Brake Conversion

Post by wpalmo »

noexitroad wrote:Is that small piece of concrete your handbrake??? :lol: :lol: :lol:
Yes. I like to keep things simple.

Regards Warrick.
1981 Stage One V8 Truck Cab
2001 HSE 4.6 Range Rover
F**kw*t
Posts: 19
Joined: Sat Aug 10, 2013 8:06 am
Location: Beds

Re: The Disc Brake Conversion

Post by F**kw*t »

I did see how old this thread is but...

Baby steps then please, I'm a newby here ruuning a 109. I'm doing my best to source a Stage one now, I've already bought a bolt-on disc conversion kit, the early Heystee (Chris Perfect supplied) Fiat Ducato/ Santana PS10 kit.

See:

http://ollr.createaforum.com/technical- ... brake-kit/

It is very good. Now i like my brakes and yes I know it's a contentious subject, but I'll not go back to drums.

Do I have thsi right? Migrating to a Stagey means I can't migrate my kit too? It was made for standard issue S2 & S3. So the solution in this post is the only real solution without going to coil axles, because my off-the-shelf kit won't fit the Stage One Hub assembly?

For those that want to know, after much b*ggering about once I'd fitted the Heystee uprated servo and an early 90 MC it worked brilliantly. Like any modrn car. Use this MC [Remember you're losing the self-servo effect of drums, it has the correct front-rear bias for a 109 with discs up front.
Looking for a Stagey now. Have you got one for me?
disco2hse
Posts: 1638
Joined: Sun Apr 27, 2008 3:51 am
Location: Auckland NZ

Re: The Disc Brake Conversion

Post by disco2hse »

If you are talking about the front, then yes you cannot just stick your standard series brake kit on. It can be done, but only with some machining. And of course, since it is a critical element in the vehicle, you need to make certain your wheels aren't going to fall off, etc.
Alan

1983 ex-army FFR 109 Stage 1
2005 Disco 2 HSE TD5
F**kw*t
Posts: 19
Joined: Sat Aug 10, 2013 8:06 am
Location: Beds

Re: The Disc Brake Conversion

Post by F**kw*t »

Oh, thanks for the quick reply. That rather persists me off, I was hoping it could be done easily. I presently run a breathed on 2.5 petrol and whilst I can assure you, I don't drive liek any boy-racer, if I push on it's a tad too fast for even late S3 spec. brakes. OK, I've not driven one yet, but in my mind for everyday use a Stager won't be slower. Far from it.

Ho-hum, I live and i learn...
Looking for a Stagey now. Have you got one for me?
Post Reply