some exotic Stage 1 in Germany
Re: some exotic Stage 1 in Germany
...go on
The second tub was cut off at a strategically appropriate location.
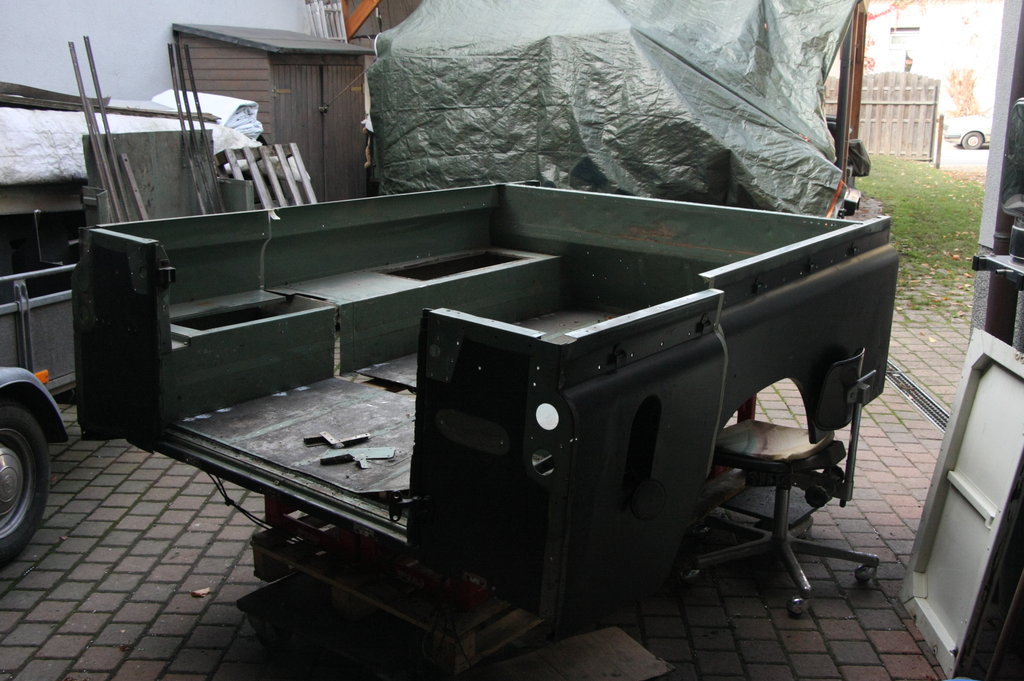
on the right it was just enough for the holes and damaged areas to be closed.
As expected, a piece of the wheel arch must be scratched on the left.
The cut only had to be reworked minimally.
>> The picture is deceptive! The top edge is pretty straight in reality ... that's how the lens of the camera bent
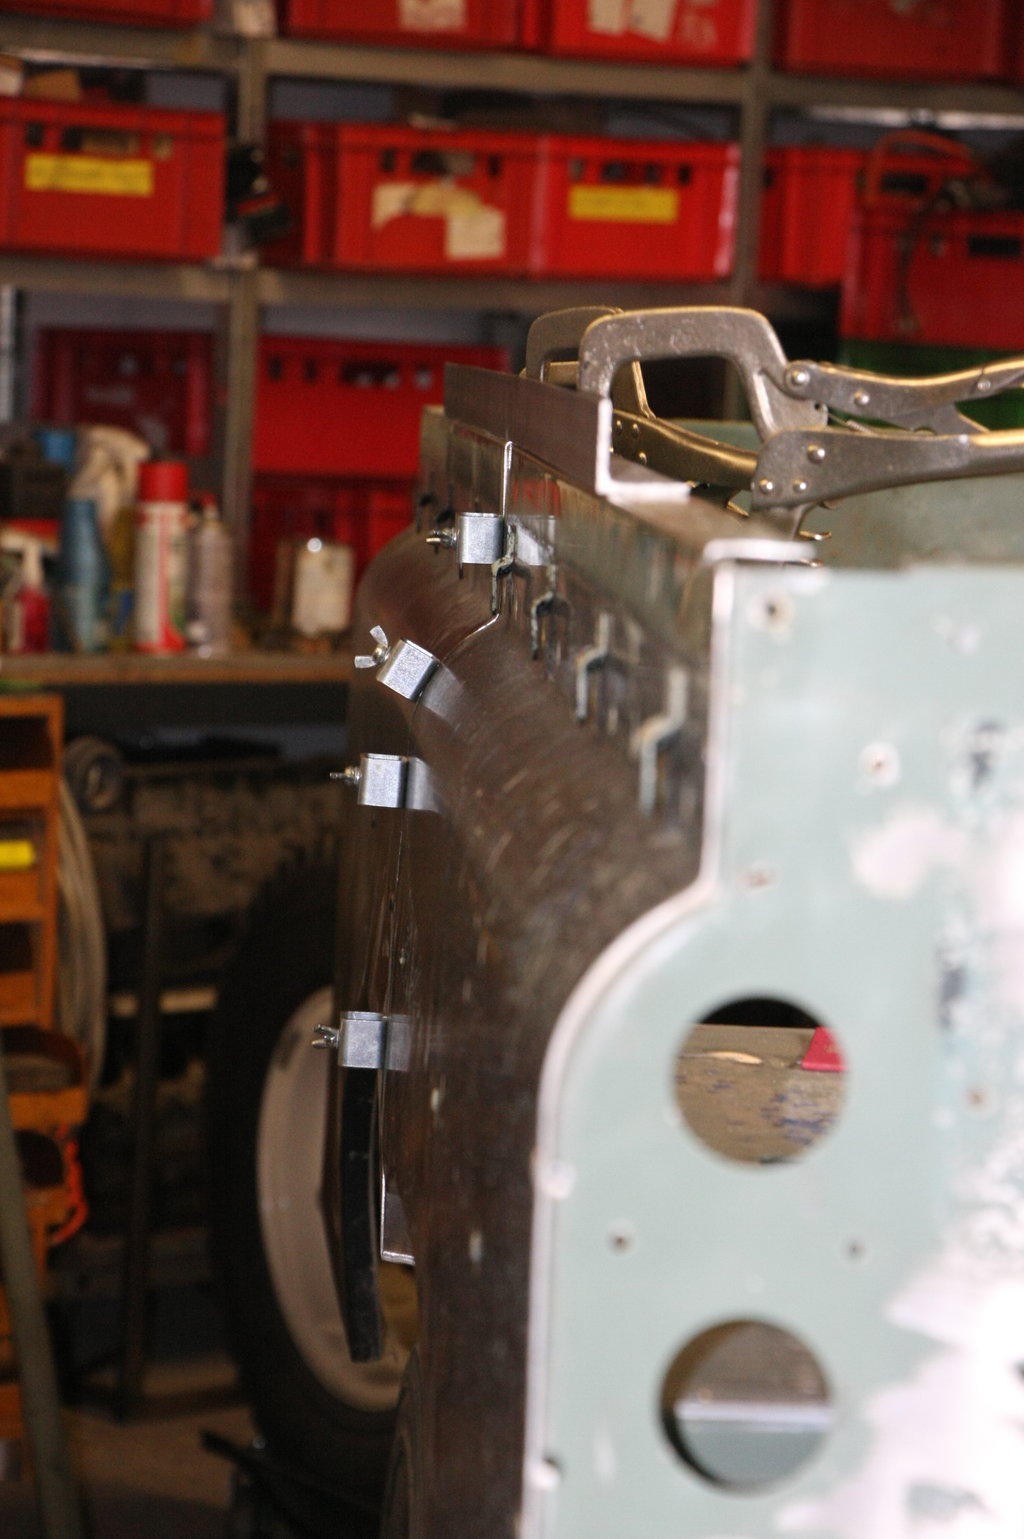
... you can see what it should be;)
The wheel arch is only reworked when the two halves are connected.
With a little tape it is easier to see how it should be.
Assembling the tub from two parts also had the advantage that the holes for the cappings and the hooks for the roof run through with almost exactly the right spacing!
Gap too fiddled, rivet holes drilled.
The area that remains open is to be able to check the tire tread while driving.
Fun by the side, the only piece of wheel arch that was long enough has a cut-out end for the spare wheel well. The part to be attached was the beginning of the section. Then you make a virtue of necessity and just make a cutout at that point. The edges are folded all around for reinforcement.
Prepare glue points
... first glued an angle plate at the top.
... there is a bit free under the angle, the capping is on the inside, there must be nothing duplicated, otherwise there will be a delay.
If the glue is solid, the piece comes under it. Only then is the wheel arch riveted, I think I can get the outer skin to fit better.
To be able to press on the next piece, I sawed jaws. It remains to be seen whether that will work.
The jaws covered with foam rubber.
Sheet metal strips directed to the inside and prepared for gluing
Glue applied and screw clamp / grip force orgy organized
... the adhesive takes 12 hours to harden ... then we are curious to see if it has turned out
...well, I think that is impressive
regards
Frank
The second tub was cut off at a strategically appropriate location.
on the right it was just enough for the holes and damaged areas to be closed.
As expected, a piece of the wheel arch must be scratched on the left.
The cut only had to be reworked minimally.
>> The picture is deceptive! The top edge is pretty straight in reality ... that's how the lens of the camera bent
... you can see what it should be;)
The wheel arch is only reworked when the two halves are connected.
With a little tape it is easier to see how it should be.
Assembling the tub from two parts also had the advantage that the holes for the cappings and the hooks for the roof run through with almost exactly the right spacing!
Gap too fiddled, rivet holes drilled.
The area that remains open is to be able to check the tire tread while driving.
Fun by the side, the only piece of wheel arch that was long enough has a cut-out end for the spare wheel well. The part to be attached was the beginning of the section. Then you make a virtue of necessity and just make a cutout at that point. The edges are folded all around for reinforcement.
Prepare glue points
... first glued an angle plate at the top.
... there is a bit free under the angle, the capping is on the inside, there must be nothing duplicated, otherwise there will be a delay.
If the glue is solid, the piece comes under it. Only then is the wheel arch riveted, I think I can get the outer skin to fit better.
To be able to press on the next piece, I sawed jaws. It remains to be seen whether that will work.
The jaws covered with foam rubber.
Sheet metal strips directed to the inside and prepared for gluing
Glue applied and screw clamp / grip force orgy organized
... the adhesive takes 12 hours to harden ... then we are curious to see if it has turned out
...well, I think that is impressive
regards
Frank
Re: some exotic Stage 1 in Germany
Damn, this needs to be in LRO or something. That is some aircraft quality work right there
Alan
1983 ex-army FFR 109 Stage 1
2005 Disco 2 HSE TD5
1983 ex-army FFR 109 Stage 1
2005 Disco 2 HSE TD5
Re: some exotic Stage 1 in Germany
That's just LR porn! fantastic
Michael
1965 109 FC SIIA
1982 109 V8 SIII CSW Stage One
1982 109 V8 SIII HCPU Stage One
1990 RRC Vogue SE
1965 109 FC SIIA
1982 109 V8 SIII CSW Stage One
1982 109 V8 SIII HCPU Stage One
1990 RRC Vogue SE
Re: some exotic Stage 1 in Germany
Thank you very much, I am happy if you like my work.
... here's an extra note
That fits really well. The rest can be easily filled.
Also unspectacular from the inside.
Then the patch can be stapled in the wheel arch.
Then the capping
1. fix
2. welding spots
3. welded and sanded
Now to the other side.
It has a little more tension. No matter what I do, the thing only stays in the right place with a little emphasis.
So another strategy:
Fix the outer skin with the "butt welding clamps".
Then rivet the wheel arch so that it absorbs the tension.
Then glued an angle in the upper area under the capping.
Oh yes, I also took care of the optimization of the jaws
I'm sure it works better.
The second page has not turned out quite as perfect.
The hip swing on the front tub is also a tad flatter than that on the rear. I think the painter gets the 0.5mm step under control.
greeting
Frank
Re: some exotic Stage 1 in Germany
At next dirty work again.
The parts aimed for the galvanizer.
....then I can continue on the bottom
There is a reinforcement on the wheel arch above each cross member. This is also necessary, here the weight is transferred from the body to the chassis. Particularly important for the long tub. Without them, the wheel arches will wrinkle.
Due to the patchwork on the chassis (by Sandringham) and the tub (by me) none of the reinforcements is in the right place
It can't stay that way >> then use the cutting chisel ... interesting what comes out of it.
Despite the inner mud pack, the sheet in the area of the bead is very well preserved.
>> But where the Crossmember lies there was collective corrosion.
I have to replace the upper area.
I cut and folded suitable sheets from the old tub floor.
The solution to the problem so that it ultimately fits was handed over to the press (n) department
Fix another drilling template and prepare the things for reassembly.
The parcel carrier was also amazed at what I get there
...maintenance flap to the fuel sender!
I also have to take care of the issue of exhaust. In any case, the original exhaust from Stage One does not fit.
greeting
Frank
Re: some exotic Stage 1 in Germany
Having read your thread on LRUK forum, I already know what comes next
Cliff
1981 109 V8 Stage 1
2000 Discovery 2 Td5
109 V8: viewtopic.php?f=6&t=2161
My Disco Thread: http://www.thed2boysclub.co.uk/viewtopi ... =3&t=58130
LAND ROVER. TURNING OWNERS INTO PAUPERS FOR 70 YEARS
1981 109 V8 Stage 1
2000 Discovery 2 Td5
109 V8: viewtopic.php?f=6&t=2161
My Disco Thread: http://www.thed2boysclub.co.uk/viewtopi ... =3&t=58130
LAND ROVER. TURNING OWNERS INTO PAUPERS FOR 70 YEARS
Re: some exotic Stage 1 in Germany
Hello cliff,
OK. then I'll just write something completely different now!
... but there are seldom days when Christmas and Easter coincide!
There you have the chance to get hold of a "Blue Mauritius".
The contents of the two boxes fall under this category.
First up, we have a bottom PTO for the LT95. With such a thing you can e.g. drive a mechanical winch.
Condition is perfect !!
As you can see, the gear output wheel and the chain wheel are one piece. This means that the PTO cannot be combined with an overdrive or center PTO.
The switching mechanism is unfortunately missing, but it is nothing difficult to recreate. To shift, only the round shaft has to be pulled in or out.
... and here the connection for the shaft to the winch.
Just shaking under Stage One is not, however, the exhaust no longer fits:?
But, I will definitely think of something!
Then we come to package no.2.
A second cardan shaft connection for the LT95 (not to be confused with a Center PTO)
That thing is "rare as rocking horse shit"! As far as I know, this was only used on the 101 with a powered trailer (there are hardly any pictures on the internet, certainly not a handful of them) and the Perentie 6x6. This is one of those things.
The gear is the same component as the one on the center diff. This meshes like the diff. in the gear of the intermediate shaft. Thus, the thing rotates identically to the cardan shaft.
The gearbox output shaft is supported in the center.
If the rear part looks familiar ... Yes, this is the original LT95 housing for the front cardan shaft.
The vacuum box switches the center diff there. The drive can be switched on or off here.
I have to look again at how the thing is lubricated. There's definitely oil drilling here.
The warehouse is open, and here too, oil can get in and out. Lubrication is not critical either, as there are only bearings in it.
The connection of the vacuum box made the transport a little crooked
But I have a replacement
The front housing is coarse sand casting >> see small series !!
Then let's see what we can make out of it ...
greeting
Frank
Re: some exotic Stage 1 in Germany
Holy crap Frank - nice finds ! Do you also have the Thomas Winch for the drive ?
Michael
1965 109 FC SIIA
1982 109 V8 SIII CSW Stage One
1982 109 V8 SIII HCPU Stage One
1990 RRC Vogue SE
1965 109 FC SIIA
1982 109 V8 SIII CSW Stage One
1982 109 V8 SIII HCPU Stage One
1990 RRC Vogue SE
Re: some exotic Stage 1 in Germany
The 8000lb Thomas is great. That is what I have on mine, converted to PTO drive from electric.
The misalignment for the exhaust is not surprising given the lower PTO was designed for the One Ten Perentie conversion. But that rear output is a real rarity alright. Well done getting it.
Alan
1983 ex-army FFR 109 Stage 1
2005 Disco 2 HSE TD5
1983 ex-army FFR 109 Stage 1
2005 Disco 2 HSE TD5
Re: some exotic Stage 1 in Germany
Hi Michael,
Unfortunately, I don't (yet) have them.
The usage profile envisaged for the Big Sandy does not stipulate that a winch must be used. I have other cars that the bottom PTO fits on.
I'll get into the subject of exhausts soon.disco2hse wrote: ↑Wed Feb 17, 2021 6:46 pm The 8000lb Thomas is great. That is what I have on mine, converted to PTO drive from electric.
The misalignment for the exhaust is not surprising given the lower PTO was designed for the One Ten Perentie conversion. But that rear output is a real rarity alright. Well done getting it.
The whole clutter is inside again. I've built in the very long translation. Take a look how it works and whether my theory with "3-speed + gentle gear" fits.
Here you can also see the output gear with the sprocket for the bottom PTO
This is what the standard bike looks like. That has claws for a center PTO
The bottom PTO and the second cardan shaft connection are only temporarily installed. I have to see how it fits with the exhaust.
One thing is clear, standard does not fit
greeting
Frank
Re: some exotic Stage 1 in Germany
I had similar problem. My PTO is a front facing Thomas chain drive from the top PTO output. It reaches down toward the chassis rail and intersected where the exhaust wanted to go. Some hammering and welding was required to get it to fit, but it also hits the cross member from time to time as a result.
Maybe Kenworth style truck pipes are worth thinking about?
Alan
1983 ex-army FFR 109 Stage 1
2005 Disco 2 HSE TD5
1983 ex-army FFR 109 Stage 1
2005 Disco 2 HSE TD5
Re: some exotic Stage 1 in Germany
That means that I would have the possibility to convert the drive of the 3rd axis to Perentie.
I still had a Salisbury from Stage 1. The thing has been in the fund for a long time and is waiting to be reused.
And the proverbs come true again. >> If you rest, you rust <<
For me it was dry but I think the axle got water at some point.
The red plague not only has the differential carrier but also one of the diff bearings. and a camp attacked by Pinion. Fortunately, the gear set is completely intact
Then everything out.
As is known, the bearing preload at Salisbury is organized by a preloaded housing. In order to be able to remove the diff, the housing must be spread by 0.3mm. When you have the chunk in front of your eyes, it quickly becomes clear that massive persuasion is required! So a mix of strength and sensitivity.
To the left and right of the cover, the diff housing has large holes to which a so-called spreader is attached.
Such a special tool can be bought for a lot of money ... but why, when you can make it yourself.
So once again I started the welding machine
...already finished
(Where is the rust? The following pictures show another differential )
Then mark the bearing cover (permanently). They must not be twisted or exchanged.
Now the measuring stand is placed on one side and the measuring probe on the other.
A lot of force is now built up via the thread on the spreader until the flanks have moved 0.3mm away from each other. This releases the diff and can be removed with a slight force.
Levering and holding at the same time is one of those things with such lumps. Fall protection makes sense
... and a clear view of the Pinion.
... and how easy it is to see, here again the axle with grate
I borrowed the large puller set from the trusted auto repair shop. Unfortunately it was of no use, I didn't get it.
... but it worked with the usual bush methods
... yes in the bush you don't have a hydraulic press, but with a hammer and mandrel it would have been possible
new bearings for the Pinion.
The differential gears also got new thrust washers.
New bearings on the diff and everything mounted.
... the contact pattern checked with spotting blue >> you can't see it well in the picture, but it fits exactly!
Then the axis was spruced up a bit and forgetting to take pictures
... the Rover axle with the intermediate gear out and the Salisbury in.
Then we made a wooden dummy for the cardan shaft simulation. As I said, the Salisbury with Diff on the left is coming in. If everything is as I hope it will be
greeting
Frank
Re: some exotic Stage 1 in Germany
Fantastic work Frank, looks amazing!!
I know that Sandringham from old - it used to be owed by Rossway, an estate local to me and was used on their shoots in the '90s. The estate got sold early 2000's and I lost track of it.
Story goes it was a cancelled export vehicle. Used to be a regular site on the lanes around here and was known as Sandringham Sydney!
Re: some exotic Stage 1 in Germany
Jeremy wrote: ↑Mon Feb 22, 2021 5:30 pm Fantastic work Frank, looks amazing!!
I know that Sandringham from old - it used to be owed by Rossway, an estate local to me and was used on their shoots in the '90s. The estate got sold early 2000's and I lost track of it.
Story goes it was a cancelled export vehicle. Used to be a regular site on the lanes around here and was known as Sandringham Sydney!
Hi Jeremy
Yes exactly!
The car was registered in the UK on Rossway. A friend of mine bought it in 2005 and brought it to Germany. He started the restoration but at some point the work came to a standstill. I bought the car in 2018.
I have a "Certified copy of a factory record" from the "British Motor Heritage Trust".
There it is stated that the car was delivered to Dubai at the end of 1980.
According to the English documents, the car was first registered in 1986. I suspect that the Sandringham came back to England from Dubai in 1986.
Dubai also fits the technology:
- LHD
- no heater
- Oil cooler
- Additional instrument for oil temperature
- no visco fan but a rigid fan
- Truck cap with tropical roof
greeting
Frank
Good to see here too >> Dubai!!
Re: some exotic Stage 1 in Germany
I'm sure its long gone - but if the Tropical Roof truck cab is available I would be interested in buying...